These pages provide documentation for Namespaces, Classes, Functions, and Variables within the MobiledgeX Android SDK.
Use either the tabs or the treeview to find the desired page. There are two main sections: Classes and Modules. Classes will bring you to a list of all classes in the Android MobiledgeX SDK. Modules will bring you to a more organized breakdown of the Android SDK. The Modules are split up into Classes , Function Groups , and Exceptions . Each of these modules group similar classes, functions, or exceptions together. For example, all of the MatchingEngine API functions will be found under Modules -> Functions Groups -> MatchingEngine APIs.
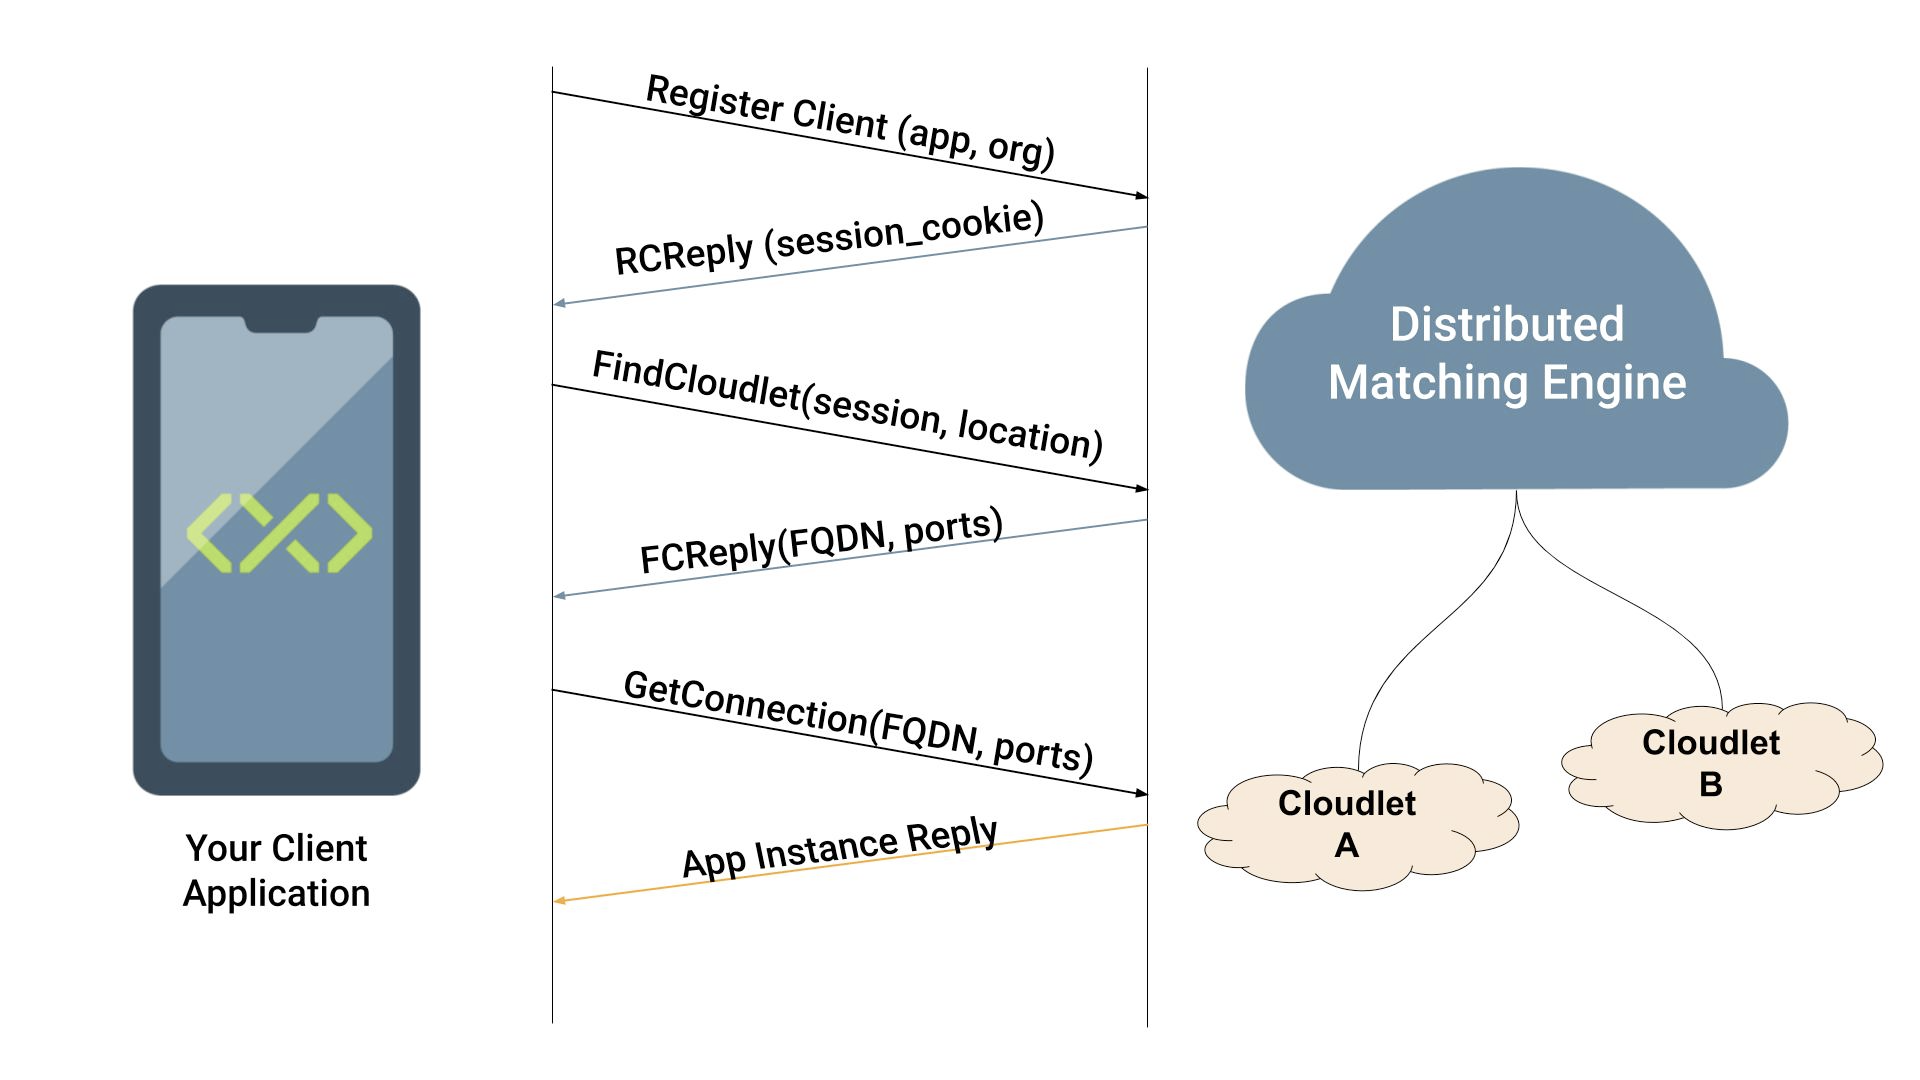
The main class that developers will be using is the com.mobiledgex.matchingengine.MatchingEngine class. This class provides functions to register the user to the Distributed Matching Engine, find the nearest application instance, and then get a connection to that application instance that is ready to be used (See diagram below for workflow). Go to the sections: MatchingEngine APIs and GetConnection Functions to get started.

Create or open an existing Android Studio project.
Add these definitions to your project's top most build.gradle file. In the same directory, create a local.properties file with the artifactory username and password you use to log into https://console.mobiledgex.net. Create a login there, if you haven't already.
Properties properties = new Properties()
properties.load(project.rootProject.file('local.properties').newDataInputStream())
def artifactory_user = properties.getProperty("artifactory_user")
def artifactory_password = properties.getProperty("artifactory_password")

project.ext.mobiledgeXContextUrl = "https://artifactory.mobiledgex.net/artifactory"
project.ext.debugRepoKey = "maven-development"
project.ext.releaseRepoKey = "maven-releases"
project.ext.repoKey = "${debugRepoKey}"
project.ext.grpcVersion = '1.32.1'
Define a repository to pull these depedencies in, using the top most build.gradle file:
allprojects {
    apply plugin: 'com.jfrog.artifactory'
    repositories {
        maven {
            credentials {
                // Create these variables if you don't have them.
                username artifactory_user
                password artifactory_password
            }
            url "${mobiledgeXContextUrl}/${repoKey}"
        }
        mavenLocal()
        google()
        jcenter()
    }
}
Add these depedencies to your app's build.gradle file:
implementation 'com.mobiledgex:matchingengine:3.0.0'
implementation 'com.mobiledgex:mel:1.0.11'
implementation 'com.google.guava:guava:29.0-android'

// Dependencies of Matching Engine:
implementation "io.grpc:grpc-stub:${grpcVersion}"

implementation "io.grpc:grpc-okhttp:${grpcVersion}"
implementation "io.grpc:grpc-protobuf-lite:${grpcVersion}"
With the dependencies defined, let Android Studio pull in the depedencies. To get started using MobiledgeX, you need a MatchingEngine instance. Since MatchingEngine needs location permissions, this might be reinitialized onResume():
For privacy reasons, there is a flag the application should ask the user for permission before enabling, concerning location usage. This is in addition to normal operating system permissions:
Then, register, and find the first closest cloudlet. If not sure of your organization or appInst details, log in and view the app details here: https://console.mobiledgex.net
Optionally, If interested in dynamic edge migration, you can enable it:
Then, attach an EdgeEvents subscriber, described later in this document:
Note that there are 2 configurations set. A application should use only one config, after deciding between performance testing (latencyUpdateConfig), or proximity based (locationUpdateConfig) newCloudlet updates. To use LocationUpdateConfig, where server pushes newCloudlet updates, simply set latencyUpdateConfig = null.
Once defined, you can start monitoring with the following. Monitoring starts when the first successful FIND_FOUND FindCloudlet Reply is returned in the next few lines of code.
Many of these methods have asynchronous Futures versions. The blocking versions below should only be run inside something like a CompletableFuture so that the UI thread is not stuck waiting for a network response. The SDK will also print warnings if running on the UI thread. If you don't have a location service running, see the "Location Callback Example" section.
Create a register client request:
Register, with a sane timeout, like 5 seconds.
Create a default FindCloudlet Request:
FindCloudlet, with a sane timeout, like 5 seconds.
To connect to the edge server instance, use something similar to the following:
Here is the EdgeEventsSubscriber class mentioned near the start of the document. The following example code is a Guava EventBus type Subscriber to EdgeEvents. onMessageEvent can be any name as the EventBus will forward it to the matching class type. The FindCloudletEvent variant is good to subscribe in your application. When recieved, the app should save state, and move to the next closer cloudlet.
It is possible to directly feed location into the EdgeEvents connection to the server. If there is a closer edge server, the app will be notified about a better cloudlet. Location permissions is app controled, as the app UI controls permission prompts between onPause() and onResume() states, where the the user might remove location permisisons.
To request android location service to run in the background, you need google play services, please read here: https://developer.android.com/training/location/request-updates#java
The application should prompt for location permissions, as well as read the network state for edge server state management. Here's example to check using com.mobiledgex.matchingengine.util.RequestPermissions. It has getNeededPermissions() to check current missing permissions. Be sure to add needed permissions to the app's AndroidManifest.xml file. Be sure to include INTERNET permissions.
The above asks for READ_PHONE_STATE, ACCESS_COARSE_LOCATION, and ACCESS_FINE_LOCATION.
If the application onPause() is called, consider calling stopEdgeEvents() to free resources. Re-enable at onResume().
When the app needs to quit or free resources, call close():